Showing posts with label aperture. Show all posts

Thursday, February 15, 2007

Camera For Dummies Basics: Shutter Speed

Hope you already had a look at the previous 2 posts:
Camera For Dummies: Basics
Camera For Dummies Basics: Aperture

As we learned earlier a basic requirement of taking a good photo is to ensure correct exposure level. A camera provides you with 2 mechanisms to do this,
1. Change the size of hole/aperture through which the light passes and thus controlling the amount of light OR
2. Change the shutter speed and thus controlling how long you expose the film to light.
We already discussed option 1 "changing aperture" in Camera For Dummies Basics: Aperture.
In this blog we'll talk about the things one can do with shutter speed.
So what can you do with/to the shutter speed of your camera?
Anyone would know the answer to that: "You can increase it or you can decrease it" :)
But what we are here to know is what happens if you increase it or decrease it.
Increasing the shutter speed will make shutter remain open for a shorter time and vise-versa.
Lets see first what happens when you use slow shutter speed.
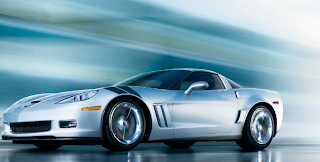
Lets say on a pleasant evening you are out shopping (I know guys you would rather watch TV) and you hear the sound of a Yamaha engine and just across the road you see a 2012 Chevy Corvette 3ZR waiting for the green. You feel lucky as you have your camera handy. But the speed of your hands is no match for 638hp of it's 7.0L engine. As you fumble to get the camera ready the lights are green and you have just enough time for a quick click before it vanishes from sight. You pray that it was in frame and the "auto" mode your camera did a decent job at deciding the exposure. But you're horrified when you see this in the LCD screen of your camera:
So what happened?!
Well lets talk a li'l math and see what we can figure..
What you realize is that the Corvette with it's 7.0L engine had already hit 60mph by the time your fumbling hands got around to click the photo. So you go back check the shutter speed that your camera had chosen for this photo and you see a figure of 1/100 (seconds). So you do quick math
60mph is ~100 kmph viz ~25 meters or 75 feet per second
That means in a 75th of a second the  Corvette would've traveled 1 feet.
So?! Well, that means when you clicked your camera the shutter opened and by the time it closed the  Corvette was 1 feet away from where it was [1/100 sec before]. And your camera recorded everything that happened between this period. So what you see is just a blur.
Now if that's clear lets see what we can do to avoid this? Given the maths we did it seems pretty obvious that if we can make the shutter speed fast enough so that the  Corvette doesn't move (at least not considerably) while the shutter is open we should have a still photo. Assuming that movement of about 5 centimeter is okay (hell, it might make it look cool actually!) then the shutter speed should be: ( 3600 / (100*1000*100) ) * 5 = 0.0018 = ~1/550 seconds.
So what we learned is that in the moving world if you want to take a still photo you must set your shutter speed fast enough to convert the movement into a still photo.
A few other examples are:
- A mosquito flaps it's wings 300 times a second, so if you want to take a still photo of a mosquito you should set your shutter speed to 1/300 seconds (0r faster)
- A formula 1 Ferrari's top speed is around 320 kmph, so to take a still photo you'll need a shutter speed of at least 1/2000 ! (this is the reason why you don't see many photographs of formula 1 cars taken at their top speed, instead people take a photo when the cars are turning at low speed, hey now you know where to sit in the stadium when watching an F1 race !)

So now you'll ask the obvious question: When we can take a still photo mostly at a fast shutter speed why use slow shutter speed ?!
Well, a fast shutter speed is a necessity (in some particular situations) where as a slow shutter speed is something of a leisure, that adds some interesting details/aspects to your photo.
Here for example is my favorite photo (again courtesy photo.net) that shows the delights of slow shutter speed:
Here the photographer deliberately slowed down the shutter speed so the train and people in the background moved while shutter was open whereas the couple were in lip-lock and did not move. Thus bringing the focus of the photograph onto the kiss.
Here is the textbook example of what happens when you use fast shutter speed (you can see each individual droplet of water), whereas if you take the same photo by slowing down the shutter speed a bit you get a much better photo, where you can see stream of water instead of droplets:
Now a few technical notes:
1. Shutter speed is a specification of camera body (as shutter is part of camera body).
2. Aperture size (min/max) is a specification of a lens (as aperture is part of the lens).
3. As for a good photo one must maintain the correct exposure level, when you slow down your shutter speed you must reduce the aperture size (close it down). At times (given the amount of light around) it's simply not possible slow down the shutter speed if we have reached the minimum aperture supported by the lens. This happens if you have a bright sunny day.
4. The exact opposite of #3, when you fasten up the shutter speed you'll have to make the aperture bigger (open it up). But in low light conditions night/evening/indoors/overcast/cloudy you'll have less light to work with and so you'll soon hit the limit to which you can fasten up the shutter speed at wide open (maximum supported). => This is the reason why you see so many party/night photos where people are blurred.
Here a few more examples of good use of shutter speed.
Fruit in water (fast shutter speed):

Sand Storm (slow shutter speed):
Bubble burst (fast shutter speed):

Waterfall (slow shutter speed):
Finally can you guess what is this photo of?!
It's the sky at night, the shutter speed was about 8-10 hours and photo was taken close the pole (not sure north or south). Basically the shutter of the camera was kept open the whole night ! So the circles you see in the sky are actually the trails of stars. Usually camera bodies would support slowest shutter speeds of up to 30 seconds. Apart from that support something called "Bulb exposure mode", in this mode when you click the button first time, the shutter opens. It closes only when you click it again (which could be after a few hours).
Before we wind up here is some homework. Can you guess how these were taken?!
Mercedes SLS

 2012 Chevy Corvette


Thursday, December 28, 2006

Camera for Dummies: Aperture


Hope you had a look at the artical on basics of camera.

Unit of the size of an ap
aperture is f-stop. An f-stop indicates the size of the aperture with respect to the [effective] focal length of the lens [attached to the aperture]. Physical size of the aperture (i.e. the diameter) is reciprocal to the f-stop of the aperture. Meaning the bigger the f-stop, the smaller the physical size of aperture. See figure below.
Note: Why use some creepy thing like f-stop when you can represent the same thing using a simple unit like milimeters [for diameter]? Well, using f-stop makes the unit independent of the focal length of the lens, so when you say that there are 2 lenses [having different focal length] with aperture = f/2 you know that both of them allow same amount of light to pass through. But if you say that there are 2 lenses [having different focal length] with aperture = 12 mm, both will NOT allow same amount of light to pass through.
Like we have the decimal series 0, 1, 2, 3 and so on, we also have an "f-stop series" which goes like this: f/1.4, f/2, f/2.8, f/4... If you are a math genius you would've figured out formula of the series. But if you also didn't score high in math like me here is how it works. The denominators are simple multiples of 1.4142135623730950488016887242097. Why this strange number? Well it is root-2 (square root of 2). And when you multiply denominators with root-2 the aperture size/area decreases in such a way that it allows half the light to pass through. E.g. if an aperture of f/1.4 allows X amount of light to pass through it then [f/(1.4*1.4)=] f/2 will allow X/2 amount of light to pass through it and f/2.8 will allow X/4. Hope now you understand the figure above. :).
Refer to: Wikipedia: F-stop for details. 

Now lets look at the side-effects of different aperture size. This is where the optics comes in.

If the aperture is big we will have deeper depth-of-field or DOF. What is DOF you'll ask? Technical definition of DOF is the distance (perpendicular to the camera) in which the subjects have a clear focus.

Photo below gives you an idea. As you can guess the left most was taken using big aperture (say f/1.4), where as the right most was taken using a smaller aperture (say f/22). Refer to Wikipedia: DOF. Difference can be seen clearly when you see how well the columns far from camera are in/out-of focus.


So why would I want to blur a photo using big aperture when I can get a nice and clear picture using smaller aperture? There are 2 straight-forward cases when one will need to use a big aperture:
1. When you are taking portraits: (Portrait photography is a style of photography). Photo below (courtesy photo.net) is a bright example of a portrait. This photo is taken with a big aperture. Imagine if the you were to see all other details (e.g. the building in the back- ground and the street light) would the photo have same impact? So usually a portrait photographer uses a lens that supports a big aperture (f/2, f/1.4, f/1.2..)
2. When the ambient light is low e.g. in late evening. As we learned earlier if the brightness of light is less AND the camera's shutter speed can not be slowed down below a limit (so that the light is allowed to expose the film for a longer time) then one is forced to use a big aperture so as to keep shutter speed at an acceptable value. Refer to shutter related section for some more info.

Now we know when to use a big aperture. So it's implicit when to use a small aperture ! When taking pics of landscapes (gardens, mountains, rivers city block/street) or architecture (castles, buildings, towers) one would want to capture details and not only a part of what is seen so these are the situations where you close down your lens to say f/8 or less (less means f/11, f/16..).


See the landscape photo below for example. Everything near, far and in between adds to the picture, we wouldn't want any of the boats or the clouds (which are far away) out of focus.


A bit more of jargon about lenses. Camera lenses' specification would provide the biggest aperture size that the lens can handle e.g. "Canon EF 50mm, f/1.4". It means the lens' focal length is 50mm and largest aperture it can handle is f/1.4. The lower limit (smallest aperture supported) is usually not of interest as most lenses support small enough aperture to take care of most photographic needs. When a photo is taken at the biggest supported aperture of a lens it's called "lens was kept wide open", the opposite of that would be "lens was closed down".
Finally, lenses with bigger max aperture cost more than those with smaller max-aperture, e.g. Canon EF 50 f/1.2 costs $1500 whereas Canon EF 50 f/1.8 ii costs $110!!

For zoom lenses f-stop spec is usually provided at both ends of zoom range, e.g. Canon EF 28-105 f/3.5-4.5, means when lens is set to 28mm, max aperture is f/3.5 and when lens is zoomed to 105mm the max aperture is f/4.5, min aperture in both cases would be quite small like f/16-18. Lens with a fixed focal length (e.g. the 50mm above) is known as a prime lens.

To summerize:
  • Bigger the aperture (smaller the f-number) shallower the DOF. Useful in low light conditions as well as portrait photography.
  • Smaller the aperture (bigger the f-number)  deeper the DOF. Useful in landscape, architecture and other forms of photography where details of most things in frame are expected to be clear/in-focus.
That concludes the aperture story. Lets move on to shutter speed.

Tuesday, December 26, 2006

Camera for Dummies: Basics

Camera:A boxlike device for holding a film or plate sensitive to light, having an aperture controlled by a shutter that, when opened, admits light enabling an object to be focused, usually by means of a lens, on the film or plate, thereby producing a photographic image.
That's what a Camera is according to Dictionary.com. But believe me it's much simpler than that. :)

To understand the how a camera works lets see how the oldest cameras were designe
d. The oldest type of cameras were the pin-hole cameras.
Lets create a pinhole camera:

1. Take a sheet of paper and make a hole in it. Diameter can be around 0.5-1 mm not more.
2. Select a wall on which the light is coming almost perpendicularly.

3. Now you need to find out "the distance". This is the distance between wall and the camera (i.e. the sheet of paper) that will expose/create the image on the wall. To to this hold your camera about 1 cm away from the wall and move it away from the wall till you see the picture on the wall.
When you see the image, you have your camera !

Of course you'll say where is the photo ?! Well, it's on the wall, if you want to make it permanent
you need a wall that can capture it. Now no one has discovered a wall like this so far but once up on a time someone put some silver dust on surface of something. Knowingly or unknowingly he managed to let some light on this surface. It turned out that the image represented by that light was imprinted on it. Thus was invented silver screen. After lotsa ppl put lotsa thought into this invention, today we have the "camera film".
So to complete our pinhole camera all we gotta do is replace the wall with this film !

Of course you have to ensure that no other light other than the one from your pinhole reaches this film coz then image will be distored.

So what do we do? Instead of just using a single sheet of paper we use a box. With a hole in one side of it and the film on the opposite side. All other sides are covered so the light come only from the hole onto the film, thus capturing the image we want and not something else. So do we have our camera now ??

Not just yet, there still the question how long do I have to expose the film to the light? We know the films are sensitive to the light, Unfortunately if you expose them to little light for a long time, it'll still have the same effect as exposing lots of light for a short duration. So what do we do ? Well, we put some mechanism to control how long the film is exposed to the light.

For the purpose of this explanation we'll use a very crude mechanism to control the exposure time. Take a sheet of
paper and cover the hole with it so no light passes through. Now lets say we know that given the amount of light around we need to expose the film for one full second (in practice it's MUCH lesser time), so put the film on the opposite wall of the hole, remove the sheet of paper covering the hole and put it back after one second. Your own little camera is ready.

Now lets look back at what we've done and get introduced to some technical jargon.

  • First we created hole in one wall of the box: This is your lens. In practice you'll use an optical lens made of glass.
  • Say the diameter of our hole is about 1mm: This is your aperture. In practice the aperture is measured in terms of f-stop instead of mm.
  • Then we put a film on the opposite wall: This your film. :)
  • We also ensured that the distance between our lens and the film is such that the image is clear (technical term is "image/subject is in focus"): This distance is the focal length of your lens.
  • We used a sheet of paper to control the exposure time: This is your shutter.
  • Using this shutter we allowed the light to pass through the aperture/lens for 1 second: This is your shutter speed. The longer we allow the light to pass the faster the shutter speed and vise-versa.
The basic principle-of/thing-about photography is to control the amount of light you allow to reach the film. This will ensure that you see the image on the film. Technically this is called controlling the exposure. If you let less than required amount of light to pass the photo will be under-exposed. There are 2 basic ways of controlling exposure:
1. The aperture size: Diameter
of the hole through which the light passes.
2. The shutter speed: Duration for which the shutter is kept open to allow the light to pass through the aperture.
In the next artical on aperture we look what can one do with aperture and what will be the side-effects.